If you’re thinking of building a WordPress static site, you’ll need a way to host it. One of the easiest and most cost-effective ways is to host your static website on BunnyCDNBunnyCDN is a service that helps your website load faster by storing copies of your site’s files in multiple locations..
BunnyCDN is a lightning-fast CDNStands for Content Delivery Network. It’s a system of distributed servers that deliver web content quickly to users base… network distributed across 74 edge locations around the world that offers incredible performance.
In this tutorial, we’ll show you step-by-step how to host your WordPress static website on BunnyCDN with Simply Static.
Let’s put everything into context before we begin.
Table of Contents
What is static WordPress hosting?
The WordPress CMS is written in PHPA widely-used programming language especially suited for web development. code. The web server your WordPress site is hosted on executes the PHP code and queries the database to dynamicallyActions or processes that occur in real-time, often without requiring a full page reload. For example, a search box that… generate content whenever a user visits it. The dynamically generated content (HTMLHyperText Markup Language. It’s the standard language for creating web pages. files) is then delivered to the user’s web browser.
This is a resource-intensive process. The web server your website is hosted on needs to query the database and dynamically generate content each time someone visits your website. This can also make it seem like your website is “slow” or unoptimized for performance.

The difference between hosting a traditional WordPress site and a static WordPress site is that the latter removes the WordPress back-end completely.
As a website owner, you’ll build your WordPress website and add content to it as you normally would. Once you’re done, you’ll use a static site generator pluginA piece of software that adds specific features to WordPress. like Simply Static to generate a static version of your website and deploy it using a service like BunnyCDN. The static hosting won’t have to query the database or deal with PHP code.
Your static WordPress site will live in a separate container that’s not accessible to the public. You can manage your site fully from this WordPress install and, once you’re done, the host will automatically generate the static HTML files. Finally, the host will deploy the HTML files on the front-end environment that is accessible to the public.
Simply Static Pro
The static site generator for WordPress. Better security and performance for your WordPress website.
Pros and cons of static WordPress hosting
Static WordPress hosting has some notable benefits but it might not be the best option for your site.
The main benefits of static WordPress hosting vs traditional hosting are:
- Better performance. You can expect your site to load faster. This is because there’s no need for server-processing or running database queries.
- Enhanced security. A static site doesn’t leave any vulnerabilities for hackers to exploit.
- Cost-effective. Hosting a static site is, generally speaking, more cost-effective than traditional hosting options.
- Development. Building and managing a static WordPress site is much easier than a regular, dynamic WordPress site.
Static WordPress hosting has its cons too:
- Deploying your site after updates. Every time you add content to your site or make changes, you’ll need to deploy it again.
- You miss out on some native functionality. With a static site, you miss out on some native WordPress functionality because your site isn’t dynamic anymore. This includes search, comments, analytics, and forms.
The good news is that there are ways around it. Check out our articles to see how you can make these features work on a static WordPress site:
- 6 Tools to Use Comments on a Static Site
- 8 Tools to Use Forms on a Static Site
- 5 Tools to Use Search on a Static Site
- 404 Pages for Static Sites
- Analytics for Static Sites
How to host your static website on BunnyCDN
To host your static site, you’ll first need to generate a static site if you haven’t done so already. The easiest way to do this is by using the Simply Static plugin for WordPress. Once you’ve generated the static WordPress site, you can use BunnyCDN to host it.

BunnyCDN is a lightning-fast CDN solution for static sites that is designed to offer incredible performance. It offers 99.99% availability across the globe. In terms of pricing, you can host your WordPress static site for a fraction of the cost of a traditional web host.
Step #1: Get your API key
Create a free account on BunnyCDN if you haven’t done so already. Next, log into the dashboard and click Edit Account Details under your account name to get to the Account Settings page.
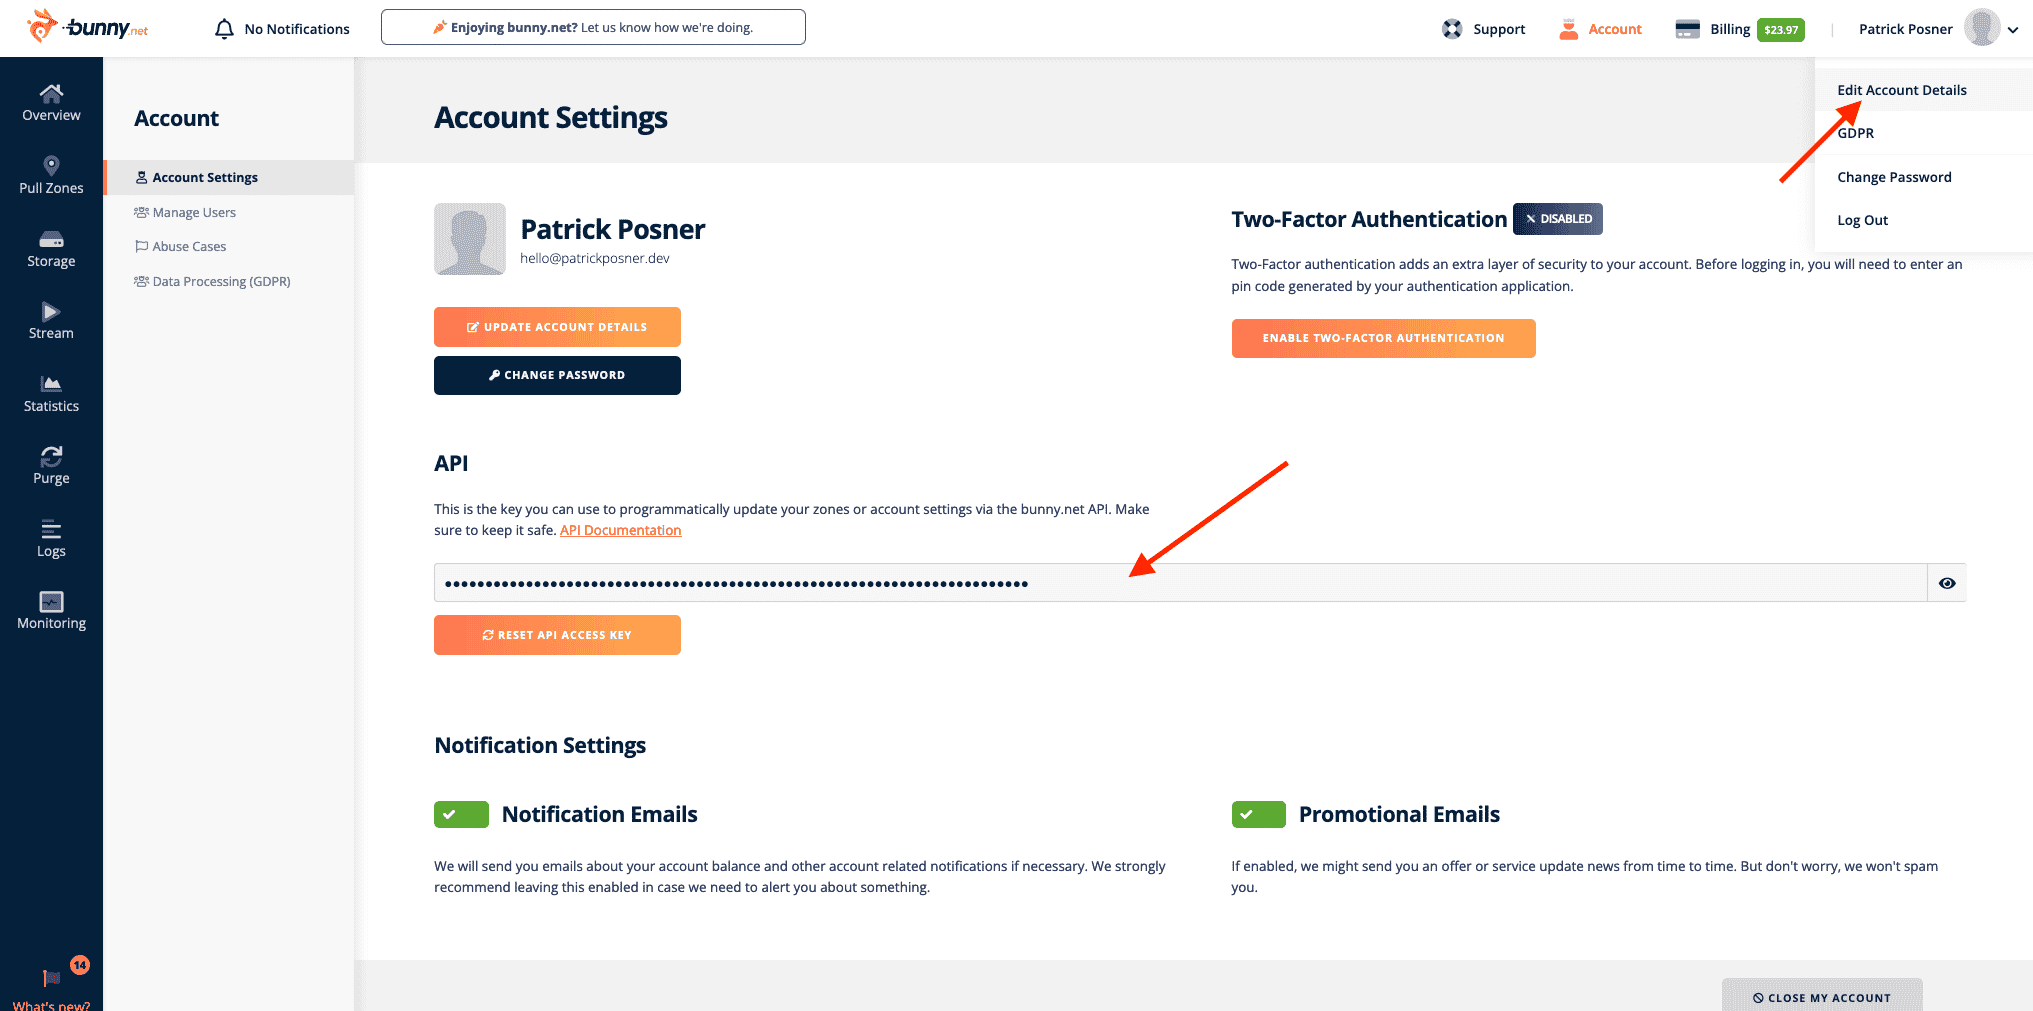
On this page, you’ll find your API keyA unique code that allows different software applications to communicate with each other. It’s used for identification a…. Copy this to your clipboard.
Step #2: Create a storage zone
The next step is to create a storage zone in BunnyCDN. To do this, go to Storage from the BunnyCDN dashboard and click on the + Add Storage Zone tab from the left sidebar. Give the storage zone a name and select the Main Storage Region using the dropdown menu.

Optionally, you can enable GEO Replication to increase data reliability and performance for uncached requests in selected regions.
Click the + Add Storage Zone button to continue.
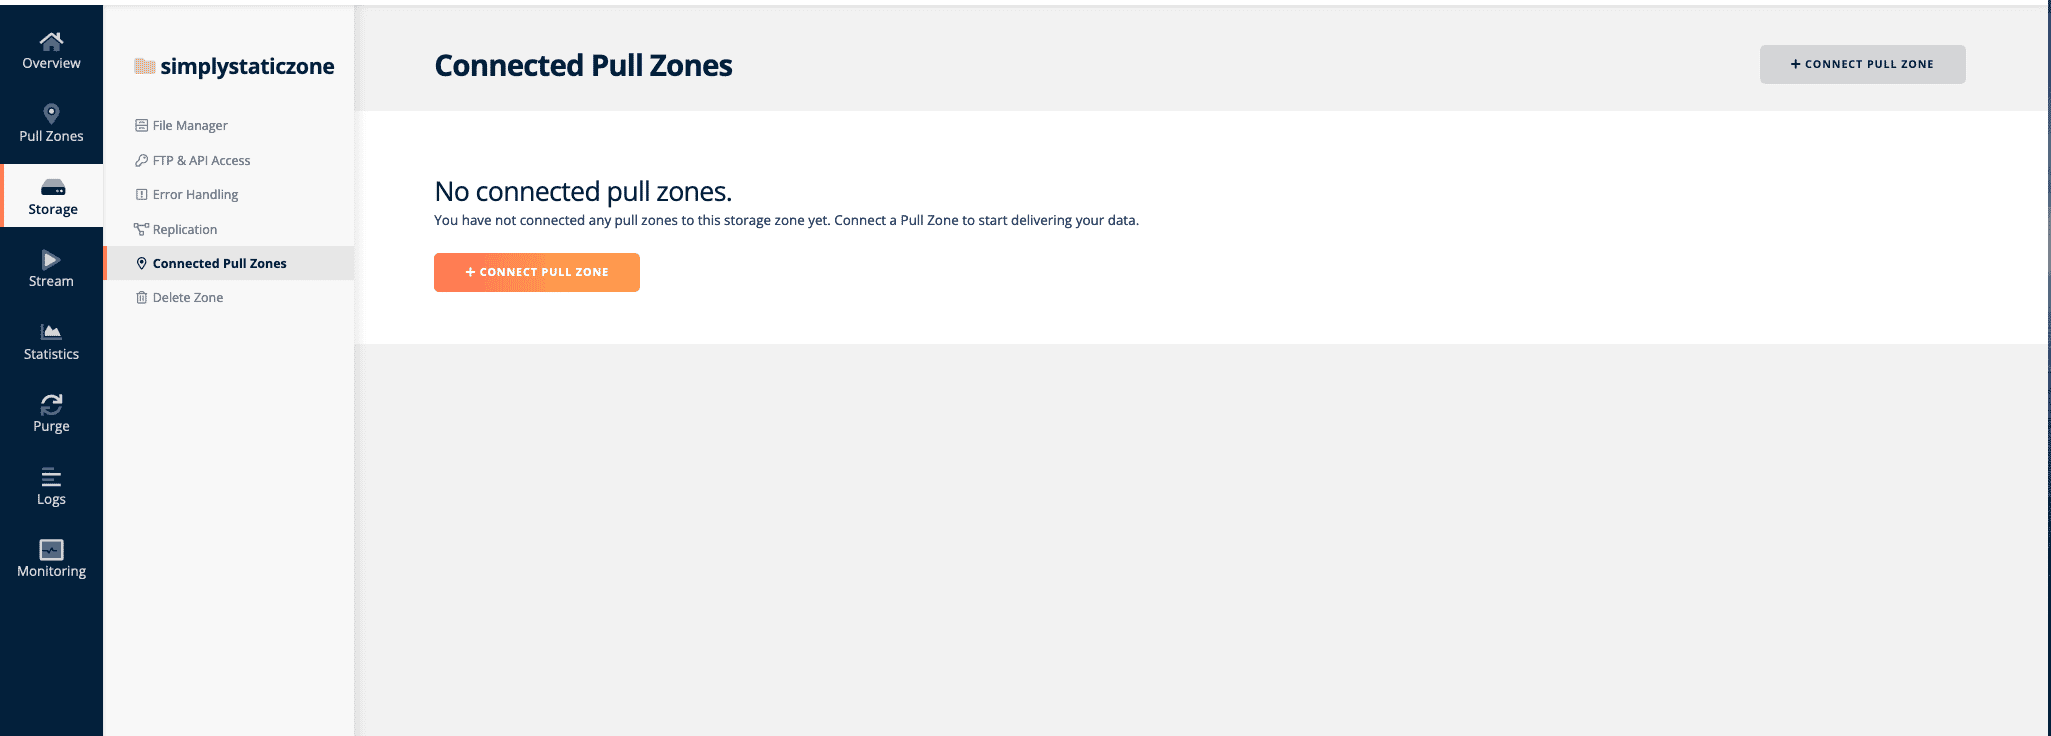
Now, if you click the Connected Pull Zones tab for this storage zone, BunnyCDN will prompt you to connect a pull zone to start delivering data.
Step #3: Connect pull zone
Next, we’ll create a connected pull zone. To do this, head over to Pull Zones from the dashboard and click the + Add Pull Zone tab.

Give the pull zone a name, enter the Origin Storage Zone (i.e. the name of the storage zone we created in Step #2).
Click the + Add Pull Zone button to continue.
Now, go back to the Connected Pull Zones tab, click the + Connect Pull Zone button to connect the pull zone you just created.
Step #4: Configure Simply Static settings
By now, we’ve set up everything in BunnyCDN. The next step is to configure Simply Static in WordPress. To do this, log into your WordPress site and go to Simply Static → Settings → DeploymentThe act of pushing the static files generated by Simply Static to a live environment where users can access them. and select BunnyCDN as the CDN Provider.
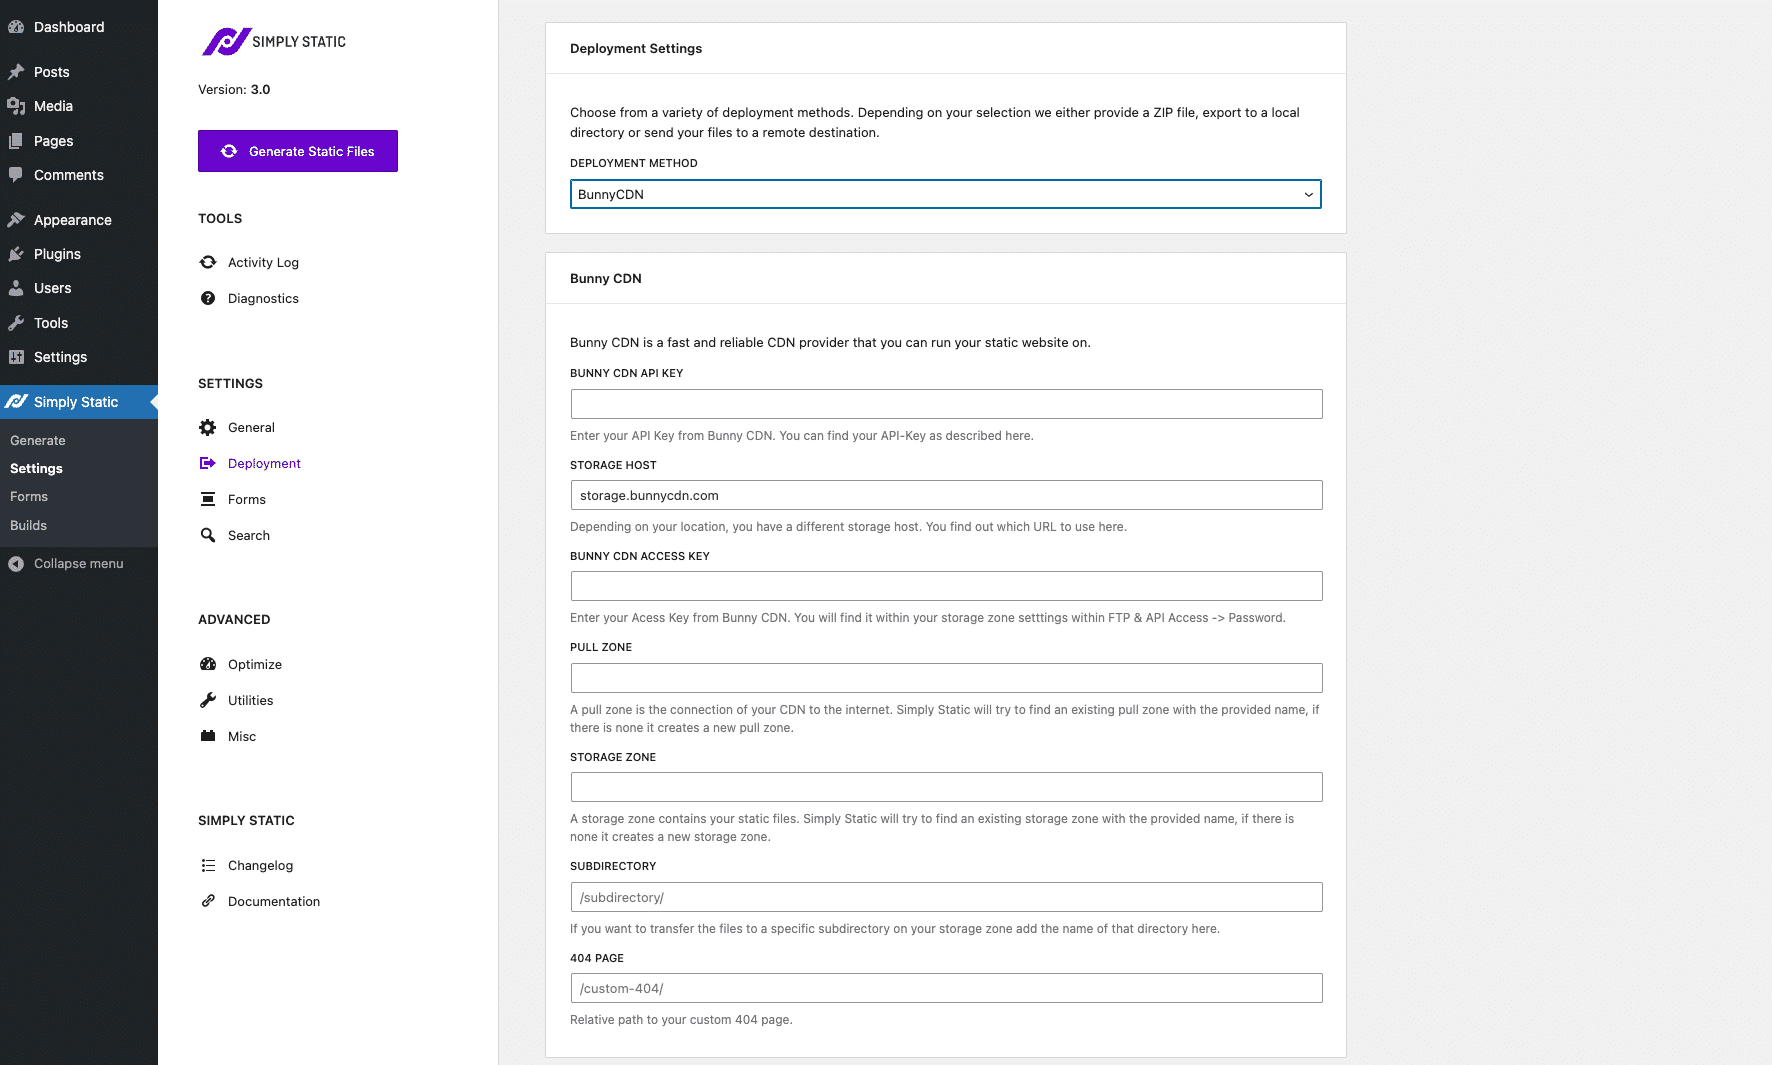
Next, fill out the CDN configurationThe setup process where you specify the settings and options for how a software or system will operate. details:
- CDN API Key – Enter the API key you copied to your clipboard in Step #1 here.
- Pull Zone – Enter the name of the pull zone in this field.
- Storage Zone – Enter the name of the storage zone here.
Simply Static also gives you the option to enter the name of the sub-directory you want to exportThe process of saving the files and data from your WordPress site to create a static site. your static files to.
Click the Save Changes button to continue.
Now, whenever you run a new static export, the Simply Static plugin will automatically push the files to BunnyCDN. It will also update existing files when you run Build exports or Single exports.
Conclusion
BunnyCDN is several times faster than traditional web hosting solutions. It’s perfect for anyone that’s looking for a lightning-fast, cost-effective host for their WordPress static site.
We showed you how to host your static website on BunnyCDN using the Simply Static plugin. Hopefully, you’re in a good position now to take the next steps.
And, once you’re done setting up your static site, be sure to check out our roundups to find the best tools and plugins to set up comments, forms, search, 404 pages, and analytics on your static WordPress site.
Simply Static Pro
The static site generator for WordPress. Better security and performance for your WordPress website.